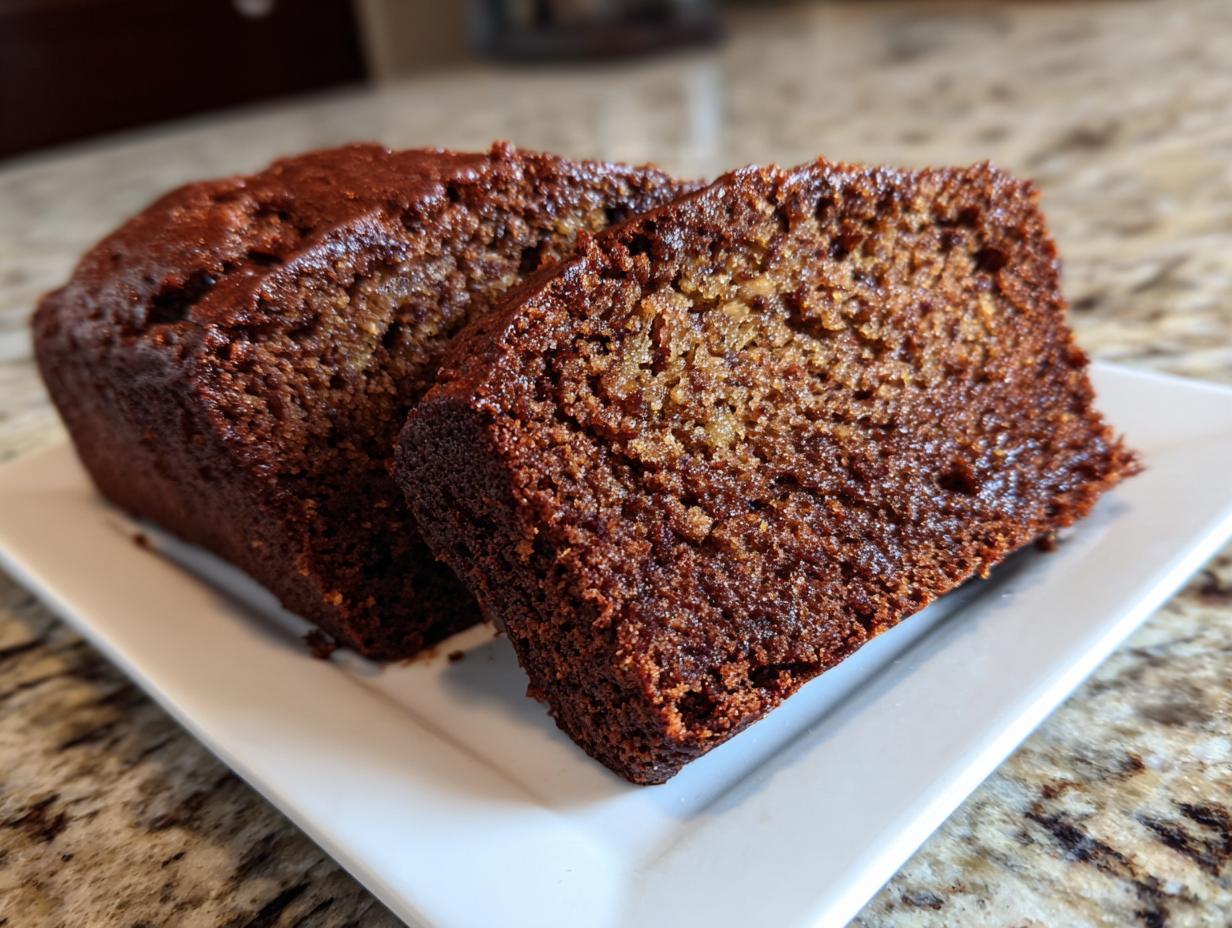
Oh, the tyranny of dry banana bread! I swear, I’ve thrown out more loaves than I care to admit over the years. They always started so promisingly, smelling like heaven, but then you slice into it, and BAM—it’s like eating sweet cardboard. It’s devastating, right?
Well, I’m thrilled to tell you that those days are over! After years of tinkering and listening to my very patient family taste-test committee, I finally cracked the code. You absolutely need to use This Banana Bread Recipe Is Foolproof and So Good: 7 Pro Tips for Perfect banana bread. Seriously, this one guarantees you a loaf so moist and flavorful, people will beg for the recipe. It’s simple, trust me, and it works every single time.
Why This Banana Bread Recipe Is Foolproof and So Good
What I love most about this particular recipe is that it delivers exactly what it promises: zero fuss and maximum flavor. We’re talking deep, caramelized banana notes that perfume your whole house. Most importantly, it produces a tender crumb that stays moist for days—no more sad, dry ends!
It’s all about the balance we strike here. I think you’ll want to check out my tips for making sure your next loaf is better than the last. It’s just good baking science, really!
The Secret to Moist Banana Bread
The secret sauce, if you can call it that, is the ratio between the melted butter and those three mashed bananas. Melting the butter instead of creaming it just coats flour particles differently. Plus, we don’t skimp on the fruit, which is where all the natural moisture comes from. It’s simple, sweet science!
Quick Prep Time for This Banana Bread Recipe Is Foolproof and So Good
Honestly, you can whip this up faster than you can decide what movie to watch while it bakes! We’re looking at maybe 15 minutes of active time here. You can easily mix it up right after dinner and still have time to relax. This is my go-to recipe when I realize I have brown bananas staring at me and need something comforting fast. Don’t forget to save this recipe!
Gathering Ingredients for This Banana Bread Recipe Is Foolproof and So Good
Okay, gathering your supplies is the *easiest* part, but don’t just grab any old banana! The success of this quick bread hinges almost entirely on what you choose to use here. I laid out the list above—it’s super short, which I love—but every single item counts for that foolproof result.
When you go looking for flavor, you want to head straight for the fruit bowl. If you’re planning to bake this week, grab those bananas that are looking a little sad and heavily spotted. They have the most sugar and the best texture needed for this recipe. You can see some of my favorite add-ins over here at my chocolate chip post, but for this basic loaf, keep it simple.
Ingredient Notes and Substitutions for Perfect Banana Bread
Listen, three very ripe, spotty bananas are non-negotiable for flavor. If they are yellow with only a tiny speck, your bread will taste bland, trust me on this one. You want those deep brown or nearly black ones; that’s flavor concentrate right there!
Now, if you’re in a genuine bind and are out of butter, you can swap it out for an equal amount of a neutral-flavored oil, like canola or vegetable oil. It won’t give you quite the richness that melted butter does, but it will still keep things wonderfully moist. Just make sure you still use the full teaspoon of vanilla extract to boost that flavor profile!
The 7 Pro Tips for Perfect Banana Bread
This section is where we move from just following steps to baking like a pro! If you follow these seven rules, I promise you will have the most amazing loaf. Remember what I said about those sad-looking bananas? That’s just Tip One. Stick with me, and you’ll see why This Banana Bread Recipe Is Foolproof and So Good: 7 Pro Tips for Perfect banana bread really does deliver on its promise.
Pro Tip 1: The Ripe Banana Rule for This Banana Bread Recipe Is Foolproof and So Good
Seriously, I can’t stress this enough. You want bananas that look like they’ve had a long, rough life—mostly brown, maybe even black spots developing. Those incredibly ripe bananas are sweeter and break down into a liquidy mush when mashed, which is exactly what you need for that deep, authentic banana flavor and the best moisture. Yellow bananas just won’t cut it, honey.
Pro Tip 2: Avoiding Overmixing for Tender Results
Once that flour hits the wet stuff, you need to stop stirring the second you stop seeing white streaks. If you keep mixing, you develop the gluten too much, and that’s how you get a tough, chewy bread instead of a light, tender quick bread. Use a light hand here, just a quick fold will do the trick!
Pro Tip 3: Adjusting Flour for Maximum Moisture in Your Banana Bread
I know the recipe calls for 1 1/2 cups, but if you want it even *more* moist, try reducing it by just a tablespoon or two. Since we are using super mushy bananas, sometimes that standard flour amount can absorb just a little too much liquid. A slight reduction ensures you keep that lovely wet texture.
Pro Tip 4: Testing Doneness Accurately
The toothpick test is your main guide, but you have to be smart about where you poke. Don’t stick it right in the center—that spot takes the longest to cook. Test about an inch away from the edge of the center. If your toothpick comes out with just a few moist crumbs clinging to it, pull it out immediately! That residual heat will finish the baking.
Pro Tip 5: Cooling Strategy for a Non-Soggy Bottom
This step saves your gorgeous crust! Don’t rush to dump it out onto a cooling rack the second it comes out of the oven. Let it rest in that hot metal pan for about 10 minutes. This lets the structure firm up just enough so that when you flip it out, it doesn’t collapse on itself, and you avoid that gummy, soggy bottom layer. It works wonders, I promise.
Pro Tip 6: Oven Temperature Check
Every oven lies a bit, you know? Especially older ones. If you’ve made this loaf before and it always seems to burn on top before the middle is done, just start checking 10 minutes early. If it looks done at 45 minutes, go ahead and test it then. Better to slightly under-bake and finish on the rack than to end up with dry bread!
Pro Tip 7: Positioning for Even Baking in This Banana Bread Recipe Is Foolproof and So Good
When placing that pan in the oven, make absolutely certain it’s sitting right in the middle of the rack. If it’s too close to the bottom heating element, the bottom crust will harden too fast. If it’s too high, the top will brown before the inside sets. Center rack is the key to an even bake all around. You can read more about other easy baking methods over here at my guide to banana nut bread!
Step-by-Step Instructions for This Banana Bread Recipe Is Foolproof and So Good
Now that you know all the secrets—like using super spotty bananas and respecting the batter—let’s put it all together. Remember, the order matters here, and so does timing! Don’t even start mixing until your oven is actually at temperature. It keeps everything running smoothly.
If you’re looking for a smaller batch version later on, check out my tips for making a quicker loaf right here: small batch banana bread, but for now, let’s bake this beauty!
Preparation and Mixing Wet Ingredients
First thing’s first: crank that oven up to 350 degrees F (175 degrees C). While it’s heating up, grease and flour your standard loaf pan. You want to be prepared so no time is wasted once the wet ingredients are combined.
Grab a large bowl. Mash those three lovely ripe bananas right into the bowl. Then, mix in your melted butter, the teaspoon of baking soda, and that crucial pinch of salt. Once that’s incorporated, stir in your white sugar, one beaten egg, and the vanilla extract. You want to mix this until it looks cohesive—not perfectly smooth, but well mixed. Take a minute now to scrape down the sides of that bowl with your rubber spatula! Trust me, you don’t want unincorporated sugar hiding on the bottom.
Incorporating Dry Ingredients and Baking
It’s time for the flour. Remember what I said about overmixing? This is where you need to be gentle. Add the 1 1/2 cups of all-purpose flour all at once. Use your spatula to gently fold it in until you see absolutely no dry flour streaks left. Stop stirring the second it looks uniform. That’s it! Stop mixing!
Pour that gorgeous batter into your prepared pan. Slide it carefully onto the center rack of your preheated oven. Now, set your timer for 50 minutes, but be ready to check it because yours might be done sooner. You’re looking for that toothpick inserted near the center to come out totally clean. If it has wet batter, give it another 5 to 10 minutes.
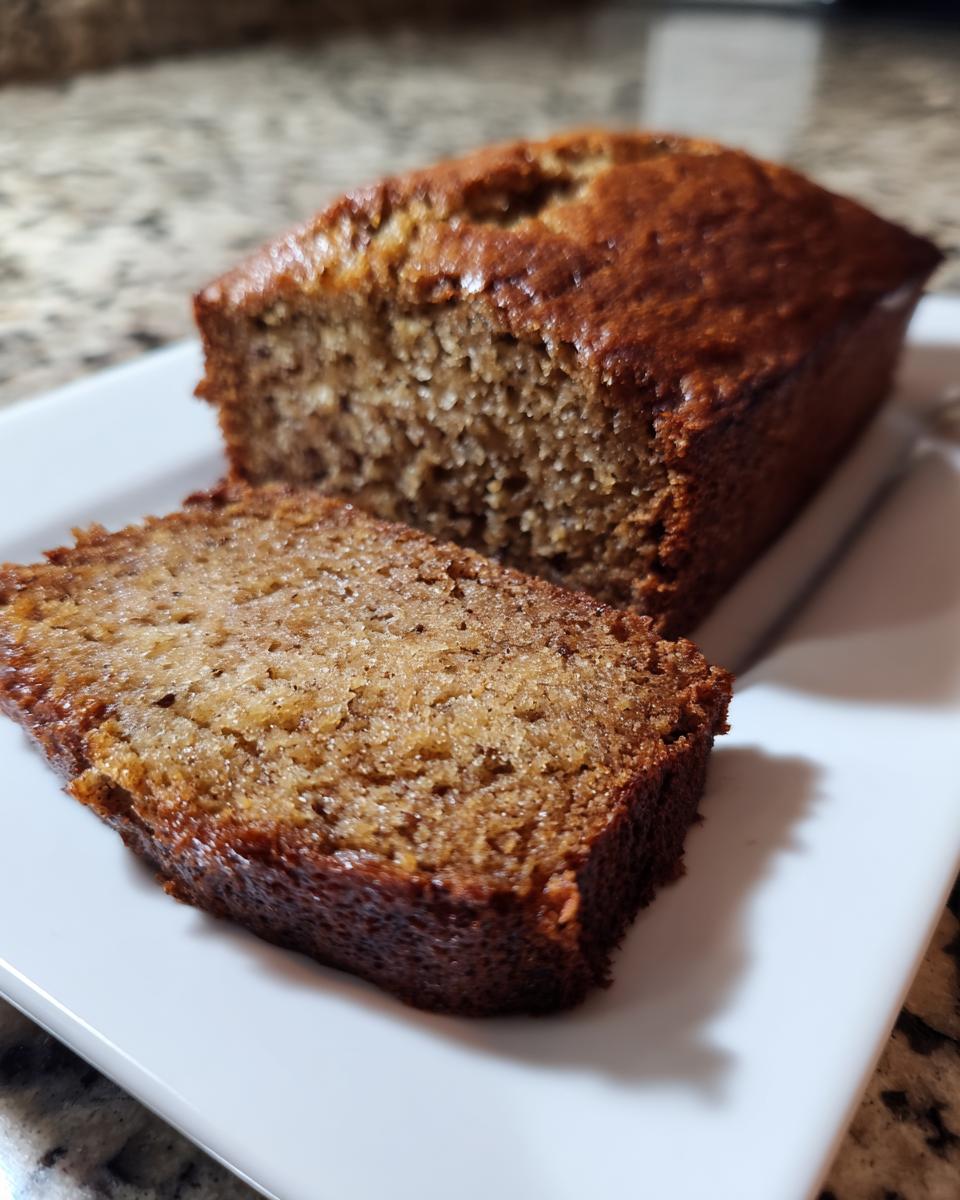
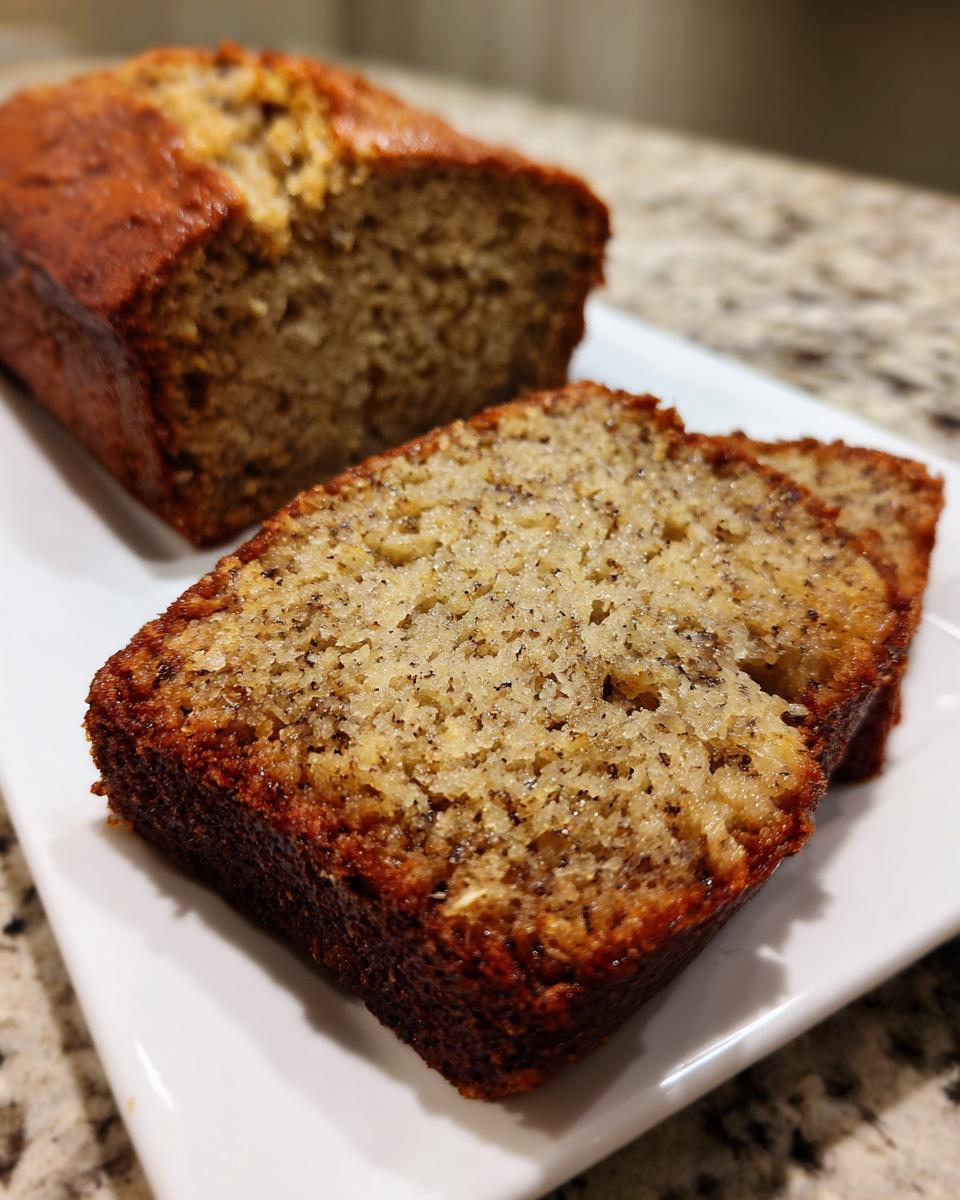
Cooling and Serving This Banana Bread Recipe Is Foolproof and So Good
When the toothpick test passes, pull the pan out, but don’t be impatient! This resting period is essential for the internal structure. Let the bread cool right there in the pan for a solid 10 minutes. This allows it to set up so it doesn’t completely crumble when you try to remove it.
After those 10 minutes, very carefully turn the loaf out onto a wire rack to finish cooling completely. If you try to slice it while it’s piping hot, you’ll get that steaming, slightly gummy texture you’re trying to avoid. Letting it cool on the rack prevents moisture from getting trapped underneath, keeping the bottom crust perfectly baked!
Serving Suggestions for Your Perfect Banana Bread
Now that you have achieved the most wonderfully moist, flavorful loaf, the real fun begins: eating it! Honestly, I’m a traditionalist; a slice of this warm banana bread is heavenly on its own, but if you want to dress it up a little, I have a couple of favorite ways to serve it up.
First, and this is crucial for the best experience, you must try it slightly warm with a swipe of softened salted butter. The butter melts right into those little pockets in the crumb, and the saltiness just wakes up the sweetness of the banana. It’s simple perfection, honestly. Don’t knock it till you try it!
If you’re serving this up after dinner or for a weekend breakfast gathering, it pairs beautifully with a hot beverage. It cuts through the richness of the bread perfectly. I love pairing a thick slice with a strong cup of coffee, or if you’re looking for something a little sweeter, try one of the great iced options from my look at favorite drinks. It makes the whole lazy morning feel slightly more indulgent, without any extra effort on your part!
Storage and Reheating Instructions for This Banana Bread Recipe Is Foolproof and So Good
The best part about making a great loaf of banana bread is that you get to enjoy it for days! Because we used such ripe bananas and plenty of butter, this bread holds up beautifully. Seriously, if you followed all those tips, this banana bread recipe is foolproof and so good that it hardly dries out at all.
You need to store it properly, though, otherwise all that hard work goes out the window. The key is to keep the air away from it so it doesn’t go stale too fast. Don’t store it in the fridge, by the way—that’s a death sentence for moisture!
Keep the loaf tightly wrapped at room temperature. I usually go for a double layer of plastic wrap, or if I’m feeling fancy, I wrap it in foil after a quick wrap in plastic. Stored this way, it stays perfectly moist and delicious for about three to four days. If it’s a super hot or humid kitchen, aim for three days.
Now, if you’ve waited a bit too long and it seems just a tiny bit firmer than when it was fresh? Don’t worry! Reheating is the best way to bring it right back to that fresh-from-the-oven status. For a single slice, microwave it for about 15 to 20 seconds. Just enough heat to soften the butter in the bread and release that amazing banana aroma again.
If you have a bigger chunk or the whole loaf you want to revive, use your oven. Wrap the bread loosely in foil—you want the steam trapped but the crust to firm up a bit. Heat it in a moderate oven, maybe 300 degrees F, for about 10 to 15 minutes. It warms right through, and the texture feels almost freshly baked again. Honestly, leftovers are just an excuse to have more banana bread the next day!
Frequently Asked Questions About This Banana Bread Recipe Is Foolproof and So Good
I know when you get a foolproof recipe, you still have questions! That’s totally okay. I’ve gathered up the things people ask me most often about keeping their loaves perfect. If you’ve been here following all my tips, you should be making the most incredible, moist banana bread you’ve ever had. But let’s clear up any lingering doubts about making This Banana Bread Recipe Is Foolproof and So Good: 7 Pro Tips for Perfect banana bread!
Can I make this banana bread recipe without baking soda?
Oh, heavens no, you really can’t skip that! Baking soda is crucial here because we aren’t using a ton of baking powder, and you need that little bit of alkali from the baking soda to interact with the acidity in the bananas. It gives the bread its lift and helps achieve that beautiful golden-brown color on the crust. Without it, you’ll end up with a dense, heavy brick that just won’t rise properly. Keep that baking soda ready!
How do I get a crack on top of my banana bread?
That crack is the sign of a beautifully domed loaf, isn’t it? It usually means the outside of your batter set up faster than the inside could expand upward. My best trick for encouraging that gorgeous split is making sure your oven temperature is spot-on—don’t underheat it! Also, make absolutely sure you are using the right amount of fat. If the batter is slightly richer, it sometimes encourages that dramatic crack pattern you see in bakery windows. If you’re curious about other healthier options, you can check out my vegan swaps!
Can this easy bread recipe be made into muffins?
Yes, yes, and absolutely yes! This batter works perfectly for muffins, and they cook much faster, which is great for quick breakfasts. You just need to fill your muffin liners about two-thirds full. Instead of 50–60 minutes in the loaf pan, plan on checking them around the 20 to 22-minute mark, or whenever a toothpick comes out clean when inserted into the center of a muffin top. You’ll get about 12 standard muffins!
Why did my easy bread sink in the middle?
That’s usually one of two things: either you opened the oven door too early while it was still setting up in the first 30 minutes, or you added too much banana/milk/liquid compared to the flour. When a quick bread sinks, it means the structure wasn’t strong enough to hold up the rise. Next time, make sure you are measuring your flour correctly, and resist that urge to peek until at least 40 minutes have passed!
Estimated Nutrition for This Banana Bread Recipe Is Foolproof and So Good
Now, I always tell people that since we are using real butter and high quantities of fruit, this isn’t exactly a “light” snack, but it’s certainly homemade and delicious! Since everyone eats different sizes, these numbers are just a general estimation based on cutting the loaf into 10 uniform slices. Keep in mind that if you use oil instead of butter, or add nuts, these totals will shift a bit.
Here’s the approximate nutritional breakdown for one slice of this amazing banana bread recipe is foolproof and so good:
- Serving Size: 1 slice
- Calories: 220
- Sugar: 18g
- Fat: 10g (with 6g being saturated fat)
- Carbohydrates: 33g
- Protein: 3g
It’s a satisfying treat packed with natural energy from the fruit. Enjoy it guilt-free because you know exactly what went into making it!
Share Your Perfect Banana Bread Success
I truly hope you had as much fun making this as I did sharing the secrets! Honestly, seeing your results is the best part of my day. I need to know—did this finally cure your dry banana bread woes?
If you loved this recipe and achieved that perfect, deeply flavored, moist loaf, please take a moment to leave a rating down below. Five stars if it truly was foolproof for you! And if you snapped a picture of your beautiful golden loaf, share it on social media and tag me—I love seeing what you all create in your kitchens. I’m always posting new simple recipes over on the main blog page, so come back soon!
PrintFoolproof Banana Bread
A simple recipe for moist and flavorful banana bread, including seven tips for success.
- Prep Time: 15 min
- Cook Time: 60 min
- Total Time: 75 min
- Yield: 1 loaf 1x
- Category: Dessert
- Method: Baking
- Cuisine: American
- Diet: Vegetarian
Ingredients
- 3 ripe bananas, mashed
- 1/3 cup melted butter
- 1 teaspoon baking soda
- Pinch of salt
- 3/4 cup white sugar
- 1 large egg, beaten
- 1 teaspoon vanilla extract
- 1 1/2 cups all-purpose flour
Instructions
- Preheat your oven to 350 degrees F (175 degrees C). Grease and flour a standard loaf pan.
- In a large bowl, mix the mashed bananas, melted butter, baking soda, and salt.
- Stir in the sugar, egg, and vanilla extract until just combined.
- Add the flour and mix until the batter is smooth. Do not overmix.
- Pour the batter into the prepared loaf pan.
- Bake for 50 to 60 minutes, or until a toothpick inserted into the center comes out clean.
- Let the bread cool in the pan for 10 minutes before removing it to a wire rack to cool completely.
Notes
- Use very ripe, spotty bananas for the best flavor.
- Do not overmix the flour; this keeps the bread tender.
- For a moister bread, use slightly less flour.
- Test for doneness with a toothpick inserted near the center.
- Cooling completely on a rack prevents a soggy bottom.
- If your oven runs hot, check the bread at 45 minutes.
- For even baking, place the loaf pan in the center rack of the oven.
Nutrition
- Serving Size: 1 slice
- Calories: 220
- Sugar: 18g
- Sodium: 150mg
- Fat: 10g
- Saturated Fat: 6g
- Unsaturated Fat: 4g
- Trans Fat: 0g
- Carbohydrates: 33g
- Fiber: 1g
- Protein: 3g
- Cholesterol: 35mg
Keywords: banana bread, easy bread, quick bread, ripe banana recipe, moist banana bread